August 18, 2017
Valve Body Inspection & Reaming for Repair
Bob Warnke
- VISUAL INSPECTION
- CIRCUIT AIR TESTING-WET AIR TESTING
- VACUUM TESTING
- AIR TEST PLATES
- HYDRAULIC TEST BENCH PROCEDURES
- REAMING PROCEDURES
CONVERSIONS CHART
- Centigrade/Celsius to Fahrenheit: (C x 1.8) + 32 = F
- Fahrenheit to Centigrade/Celsius: (F - 32) x .555 = C
- Bar to Psi: Bar x 14.5 = Psi
- Psi to Bar: Psi x .06895 = Bar
- Liters per minute to Gallons per minute: L x .2642 = G
- Gallons per minute to Liters per minute: G x 3.7854 = L
- Millimeters to Inches: mm x .0397 = inch
- Inches to Millimeters: inch x 25.4 = mm
 |
OE Valve to Bore Tolerances
Hydraulic valves must stroke in order to control fluid flow. Minimal valve to bore clearance is required to allow movement and to seal circuitry. That clearance, allows for a minimal oil film to support the valve during the stroke. The casting being porous helps to retain this fluid. The specification for total diametrical valve spool to bore clearance is . 0005” minimum to .0016” maximum. (.0127mm–.040mm) In comparison, a human hair is typically .0034” (.086mm) and a piece of paper is .0045” (.114mm). A particle of contamination that is larger than this clearance, can become imbedded as it travels with the valve and can score the softer of the two surfaces. The sharp edge on the valve is designed to act as a wiper to push the particles before they imbed and cause the valve to stick.
 |
Excess Tolerance Reduces Pressure and Flow
The pump and main pressure regulator valve are the heart of the hydraulic control system. Pressure and flow of circuits downstream of the main regulator valve, are dependant on it’s position. Hydraulic circuits currently use primary and secondary regulator valves. The primary limits line, which feeds clutch circuits and opens a path to charge the converter. The converter has a lower priority and a reduction in flow due to the valve movement to maintain specific regulated line pressure. The regulator spring and additional boost reduce converter charge and exhaust and the balance circuit, increases converter feed and exhaust, which reduces line. In the design of the rotary vane pump, the main regulator valve controls the pump slide position.
Secondary regulators such as the Actuator Feed Limit, Solenoid Modulator, Converter regulator, limit the pressure after them. The concern, is that wear and loss after these regulators, reduces the ability for the TCM to control the electro-hydraulics.
Tools Required for Visual and Deflection Inspection
LED light, varied inspection lens or reading glasses of 1.5 to 3.5 power. Dial indicator or veneer caliper as measuring instruments for sag/deflection testing. The procedure and formula to calculate valve deflection is available at the Sonnax web site. To identify warp-age and bolt tension, a pressure sensitive film can be used.
 |
 |
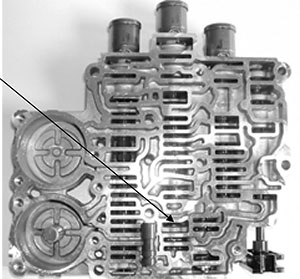
Primary Valve Inspection
Inspect the most active valves and their bore first, starting with the main regulator and moving on to secondary regulators. Regulator valves can be identified with an oil circuit, or by tracing the exit circuit from a PWM solenoid. Preliminary requirements include a clean dis-assembled valve body casting and good lighting.
Appearance of Wear

Bore wear is the most common and critical. With the valve removed, look into the casting from the same direction at which the fluid enters and toward the opposite side. The valve will be loaded onto that side as surface pressure increases radial contact. The casting will appear to have a polished crescent area, when worn. A flower petal appearance, a visible step or spiral machining also reduce the seal created by the valve spool.
 |
 |
Do Valves Wear?
Anodized valves may have scoring, be machined out of round or have sharp edges, all of which scuff the casting. If you see wear on an aluminum valve, it has a surface coating rather than a penetrating anodized coating. Some valves may display witness marks from bore wear.
Check valve spools for sharp edges. If finish is irregular, spin within micrometer to check for concentricity. To isolate a bent valve, install into valve body bore and rotate. If it binds during rotation, it is distorted.
 |
 |
CIRCUIT AIR TESTING
A captive air, clutch pressure or wet air test (W.A.T.) are descriptions for a similar test using regulated (30-60psi/2/4 bar) air pressure and ATF. Air testing clutch circuits has been suggested in OE repair manuals, in this condition is applied to valve body circuits. The benefit is that minimal tools are required and leakage is visual and audible. It must be noted this method requires experience and a visual test is not measureable, left to the experience of the operator. Eventually fluid and air will be forced through normal valve to bore clearance. Fixtures can be made to isolate valves and solenoids can be used to create test manifolds.
Calibrated air test stands can be used to indicate a measurable percentage of loss. This type of equipment results in a repeatable air pressure test.
 |
 |
5L40E
Wet Air Test Tool
Complaints:
- Loss of reverse at high pressure
- TCC slip codes
Cause:
- Wear at inboard end of reverse lock out bore.
- Excess cross leaks from TCC solenoid and/or bore.
- Excess wear at AFL bore.
 |
 |
| Wear at inboard end of reverse lock out bore. | Use OE, BMW or this Borg Warner TCC solenoid |
Methods to Verify:
1. With selector in reverse, pressurize the line pressure tap while plugging the filter hole. Air and fluid should not leak across the reverse lock out valve.
2. Make a TCC test tool. Insert the tool in place of the TCC solenoid. Air test again, through its center hole. Reverse lock should stroke.
3. Install cross hole plug into the test tool. Install oil pan, fill and retest at maximum pressure in reverse.
4. If there is a loss of reverse, bore wear or cross leaks are the problem.
5. If there is no loss of reverse, TCC solenoid is cross leaking.
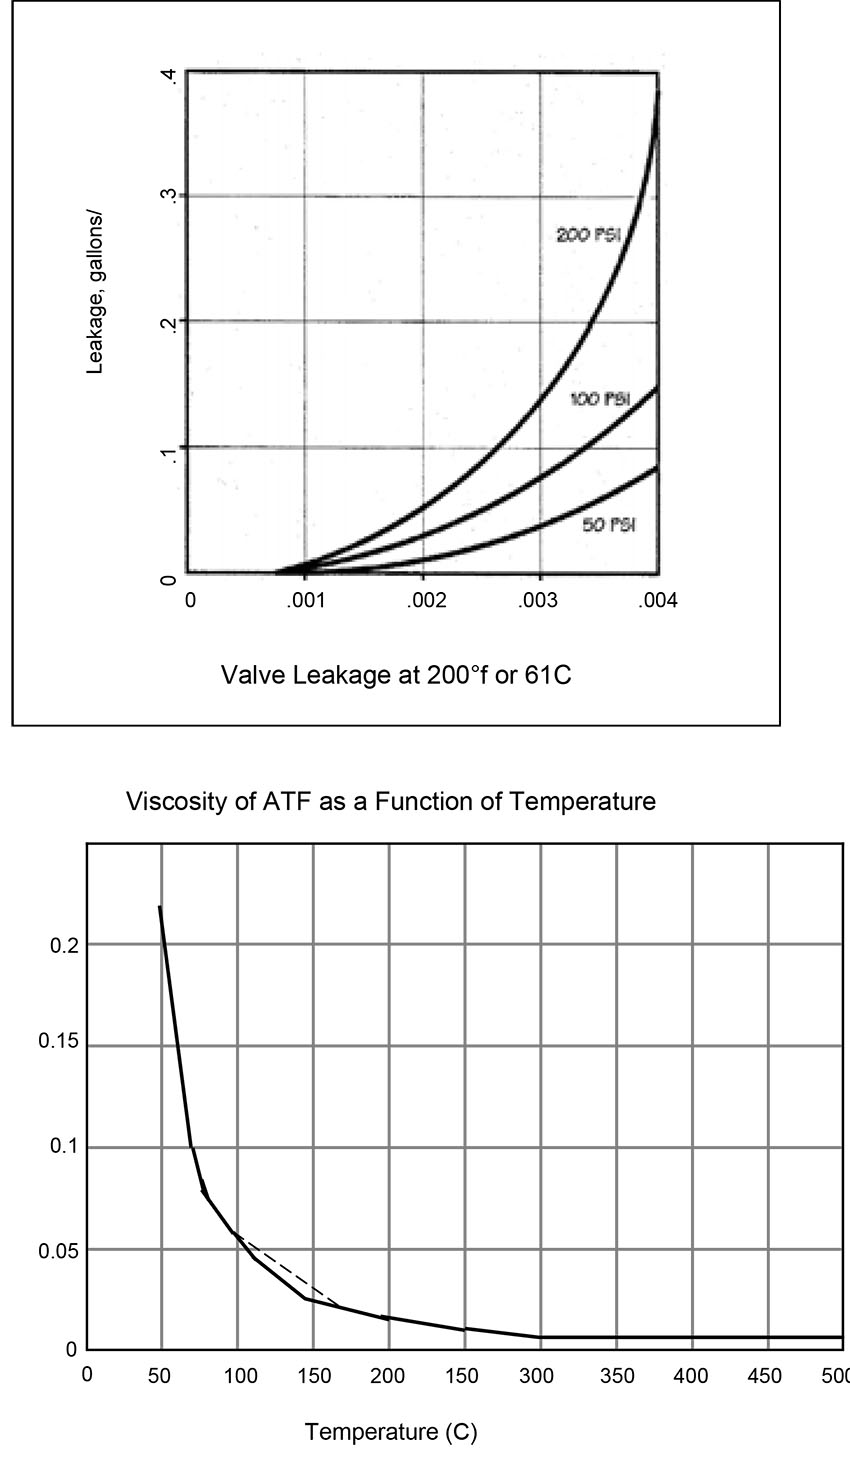
VACUUM TESTING
Vacuum testing is an effective, repeatable test, which identifies valve to bore clearance. The larger the leak, the lower the vacuum reading obtained. The result is entirely dependant on the efficiency of the vacuum pump itself. Types of vacuum pumps include an air pressure venturi, air driven motor and electrical driven pump. If you select a venturi or air driven vacuum pump, insure fluctuations in volume of shop compressed air, does not affect the vacuum reading. This will require a regulator prior to the air motor, an orifice after the air motor and possibly a storage accumulator.
Note: Any type of vacuum pump must have a method to control its volume. Features and
benefits include a calibrated vacuum station which results in a repeatable outcome.
 |
 |
Sonnax calibration standards:
- Maximum vacuum 28” obtained in 3 seconds or less
- With test hose open ended vacuum drops to 0
- With .035” orifice in end of hose, vacuum is 5-7”
- To alter/reduce vacuum with te .035” orifice, reduce the adjustable orifice, prior to gauge.
- Note the larger the valve spool diameters, the less vacuum you will obtain.
- Pulling a vacuum over two spools will reduce total vacuum obtained.
- Must clean & dry the valve body or fluid and contamination will plug the orifice and fill the pump. This slowly leads to a reduced vacuum reading! Calibrate and clean periodically.
- On two open sided valve body castings, use a dense foam pad to seal underside.
- Rubber tips from hand-held vacuum pumps, work well for orifices such as the O1M.
Typical results:
- Valves with diameters over .450-17” or better
- Drawing over two spools at one time, both smaller than .350-17” or better.
- 15” or less will not function properly at operating temperature.
- 15-17” is questionable on how long it will function properly.
- 18” or greater is suggested for a spool under .450”
AIR TEST PLATES
Air test plates utilize a regulated air supply, and accumulator and a calibrated pressure and flow fixture. Refer to the captive air test station.
In vacuum testing, the casting must be clean and dry, which requires disassembly. With air testing, the unassembled core is bolted to the plate and the leakage is identified before labor is involved. Air pressure enters each valve independently and pushes the fluid out. The amount of stabilized air flow, is monitored on the gauge as a percentage of leakage.
HYDRAULIC TEST BENCH
Hydraulic test stands are designed to control the valve body and duplicate the pump and function of the transmission case. Instead of the fluid terminating at the clutch or converter, gauges or pressure transducers are used. The test stand charges the entire valve body and operates each shift and TCC sequence. The hydraulic stand does not pinpoint bore wear, but can identify the loss of gear change or low pressure.
In order to identify specific problems common to the valve body, additional test points should be added, where they could not be accessed within the case. These should be plumbed into the test plate downstream of the secondary regulators and after the solenoids.
Examples of secondary plumbing:
The GM actuator feed limit circuit requires 48 to 52 psi. (3.3-3.5 bar) to fully stroke the shift valves. If the AFL circuit has low psi or solenoid signal pressure is low, the unit will have a wrong gear start or loss of gear.
If the Ford 4R70W has excessive solenoid pressure, it will neutral on a 4-3 downshift or have delayed forward engagement.
EQUIPMENT FOR THE VALVE BODY SERVICE AREA
Must have items:
- Good lighting
- Separate cleaning tank and bench
- Small lathe and arbor press
- Surfacing stone
- Vacuum testing station and regulated air supply
- Reaming fixture and fluid circulation tank
- Vise and assembly fixture
- Small freezer
- Roaster oven
- Variable frequency solenoid controller
Nice to have items:
- Air test plates
- Hydraulic test bench
- Electronic simulator
- Ultra-sonic cleaner
- Oil bath resurfacing stone
Process suggestions:
- Have solenoid information and exploded views at the bench (PC Monitor)
- Prepare rebuild sheets for each valve body. Improves consistency and tracking.
- Tear down bench separate from reassembly bench.
- Selective parts trays
REAMING PROCEDURES FOR VALVE BORES
Sonnax has produced a valve body service DVD, which examines reaming and testing procedures and can be obtained at no charge.
Reaming Tips:
- Use a low speed air drill, electric or cordless drill motor for turning the reamer. Turning speed of 175-225 RPM. Inward force on drill of 2-3 lbs. Use a wobble-head drive adapter between the drill and the reamer socket.
- We suggest mounting the VB-FIX, to a swivel assembly. This allows the casting to be positioned so reaming fluid runs away from other circuits and reduces contamination and cleaning time. The position should be such, that the operator does not exert a side force on the shank.
- Use caution in clamping the valve body to the VB-reaming fixture. Using two clamps may distort a casting. This distortion causes the reamer to bind and slows or stops cutting progress. If continued, this distortion and loading will causes the reamer to dull and eventually the valve will not install.
- The alignment pin must telescope freely within the guide and bore. If the pin hangs at all, reposition the bearing plate wing nuts until it moves without drag. If the bearing plate position does not free the pin, then reposition the valve body again.
- Reaming time is dependant on the amount of material removed. There will be areas in which the reamer may not cut/walk inward as fast as others. If the reamer travel slow, DO NOT push harder than the 2-3 lb. force as heat increases at the cutting edge and material will stick to it. If the cutting edge develops an edge burr, remove the burr by pulling a tool from the shank toward the tip.
- We suggest a reaming fluid recirculation tank, with two nozzles to direct the fluid and flush out chips for an extended reamer life.
Bob Warnke is vice president of technical development and a member of the TASC Force® (Technical Automotive Specialties Committee), a group of recognized industry technical specialists, transmission rebuilders and Sonnax Industries Inc. technicians.
Learn More
While Sonnax makes every effort to ensure the accuracy of technical articles at time of publication, we assume no liability for inaccuracies or for information which may become outdated or obsolete over time.