Diagnosing A750E/F 2-3 Flare After Overhaul
Jeff Parlee
Diagnosing shift quality concerns can be difficult, especially after rebuilding the transmission. You have just invested parts, your time and expertise into repairing the transmission. You are emotionally invested, which sometimes makes it hard to think clearly. This can be the case when you have a Toyota/Lexus A750E or A750F that has a 2-3 flare after overhaul.
First, you drive the vehicle to try and relearn the shift adapts. If that doesn’t fix it, it is tempting to yank the unit and look for the problem. I would recommend taking the time to diagnose the problem first, then you have a better idea where the problem may be.
First, you can check the C3 clutch pressure during the 2-3 shift and compare it to the line pressure (Figures 1-4). The C3 clutch pressure should ramp up from zero to within 10% of line pressure over the course of about one half second. Line pressure must rise normally (see Figure 4 for line pressure specifications).
Figure 1:Clutch Application Chart | ||||||||||
|---|---|---|---|---|---|---|---|---|---|---|
| Gear Selected | C1 | C2 | C3 | B1 | B2 | B3 | B4 | F1 | F2 | F3 |
| Park | ||||||||||
| Reverse | O | O | O | O | ||||||
| Neutral | ||||||||||
| First | O | O | ||||||||
| Second | O | OO-M2 | O | O | O | |||||
| Third | O | O | OO-M3 | X | O | |||||
| Fourth | O | O | X | X | ||||||
| Fifth | O | O | O | X | OO-M1 | |||||
| Key: O = Applied OO = Applied in manual range for engine braking X = Applied, but not transmitting power | ||||||||||
Figure 2:C3 Pressure Tap Location, Left Side of Case | Figure 3:Pressure Tap Location, Right Side of Case |
|---|---|
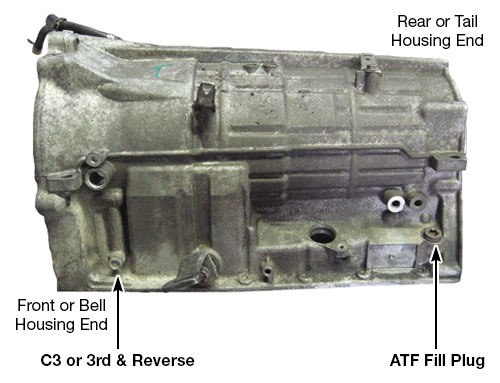 | 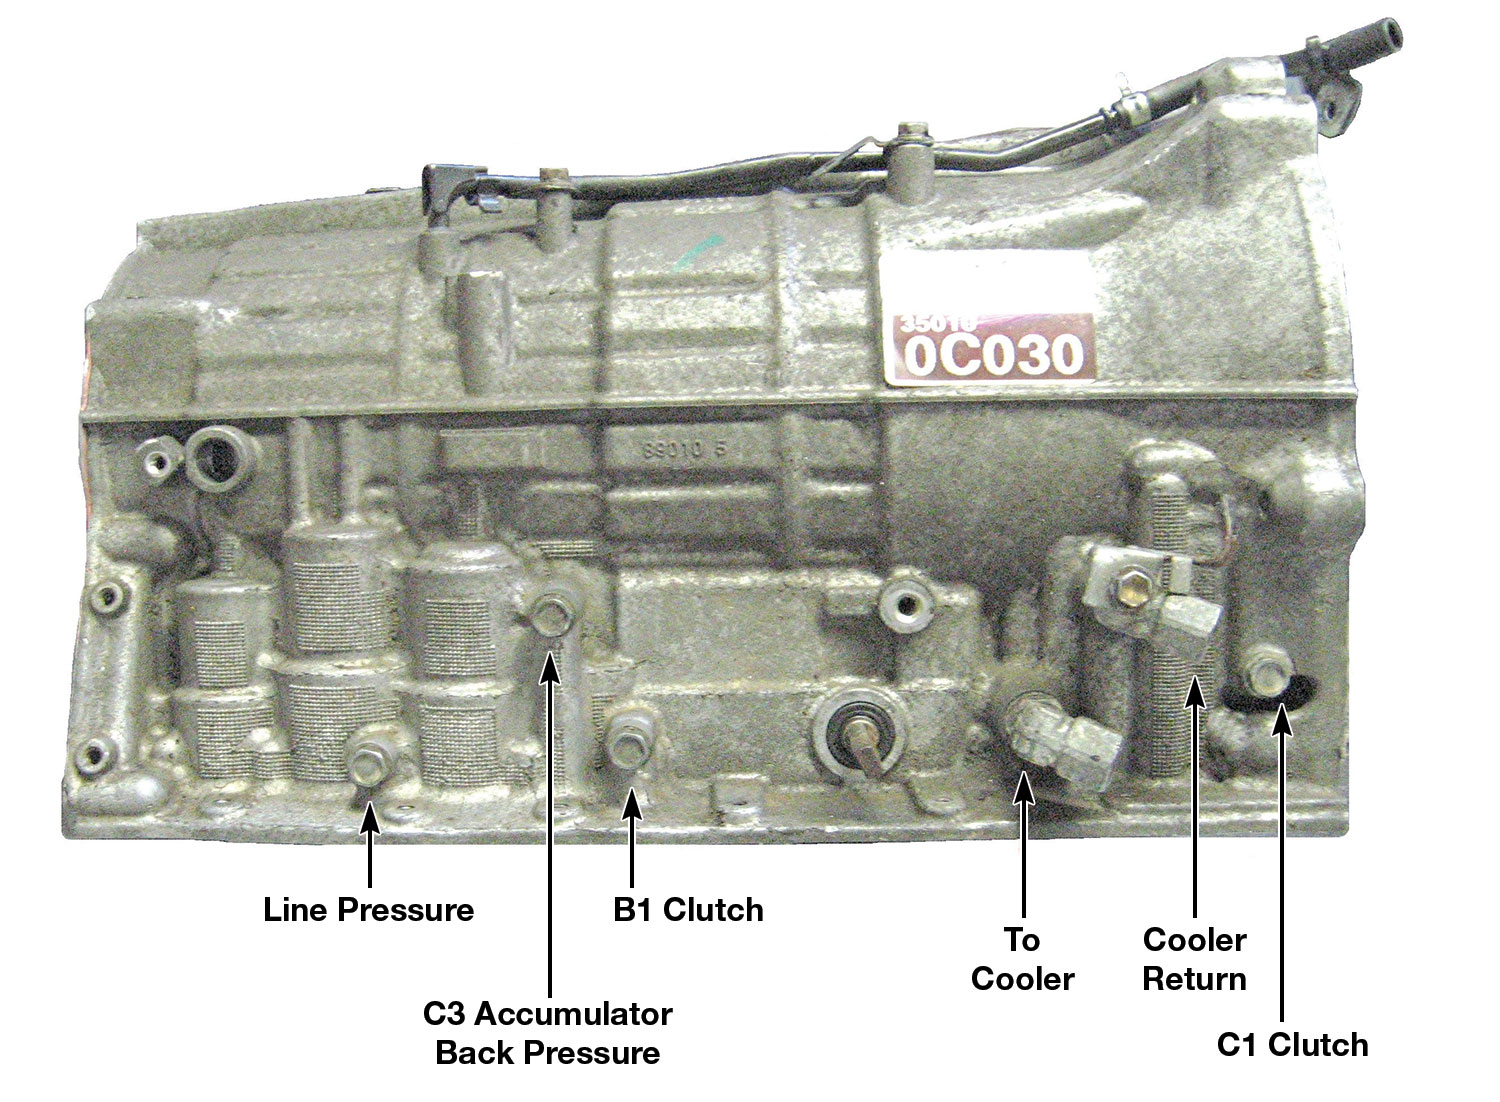 |
Figure 4:Correct Line Pressure | ||
|---|---|---|
| Drive | Reverse | |
| Idle | 52-62 psi | 73-87 psi |
| Stall | 196-214 psi | 185-218 psi |
If C3 pressure is slow to rise or never rises completely, you could have a leak in the C3 oil circuit, a problem with the valve body or S1 Solenoid. If the pressure in the C3 oil circuit rises normally, you could have the wrong spring in the C3 accumulator (Figures 5-7), damaged C3 accumulator seals, the wrong transmission fluid in the transmission or the aftermarket frictions in the overhaul kit are not applying (grabbing) as quickly as the OE frictions. I have had several instances where the OE C3 frictions were installed back into the transmission and the 2-3 flare disappeared.
Figure 5:Accumulator Spring Guide | |||||||||
|---|---|---|---|---|---|---|---|---|---|
C1 Inner | C1 Outer | C3 Lower | C3 Upper Inner | C3 Upper Outer | B3 Lower | B3 Upper | C2 Lower | C2 Upper | |
| Free Length | 1.175" | 1.840" | 1.725" | 3.020" | 2.540" | 2.50" | |||
| Outside Diameter | .445" | .670" | .550" | .780" | .770" | .630" | |||
| Wire Diameter | .063" | .094" | .094" | .099" | .102" | .067" | |||
| Color | Plain | Plain/ Light Green | *Pink/ Yellow | Yellow/ Plain | Plain/ Red | *White/ Plain | Orange/ White | *Green/ Plain | Plain/ White |
| *Spring is attached to the accumulator piston. | |||||||||
Figure 6:Accumulator Springs | Figure 7:Accumulator Locations in the Case |
|---|---|
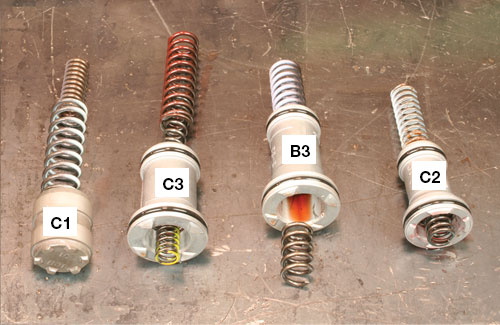 |  |
Taking the time to diagnose the problem will usually help to decrease the repair time. I have not yet met a technician who wants to work on the same transmission a second time.
Related Units
While Sonnax makes every effort to ensure the accuracy of technical articles at time of publication, we assume no liability for inaccuracies or for information which may become outdated or obsolete over time.