March 28, 2018
Replacing Valve Bodies Dos and Don'ts! Part II
Robert Moreau
There is nothing worse than completing a repair and finding out afterward that the original customer concern is still there or that a new symptom has cropped up. Adding to our frustration, when this happens, we must now put aside profitable work and spend valuable time trying to figure out why the repair was unsuccessful or why there are new symptoms. The good news is that we can mitigate or avoid the risk of these unwelcome post-repair surprises by consistently following a solid diagnostic and documentation process before replacing any suspect parts.
Let’s say you have decided to install a remanufactured valve body instead of rebuilding the one that came out of the transmission on your bench. In many cases, this is wise, both financially and technically. Perhaps you don’t often see this transmission model, and it may not make sense to go through the expense of tooling up to fix it yourself, not to mention the time saved by simply bolting in a replacement.
When you replace the valve body instead of rebuilding it, on one hand you gain by getting a valve body that has been refurbished with oversized valves, remanufactured or new solenoids, and tested to ensure it is working as designed. On the other hand, you don’t get the benefit of taking the original valve body apart to vacuum test bores, assess wear or find sticking valves or solenoids, and disintegrated checkballs and so on. You may even miss a host of other useful hints that can help explain why the transmission had the symptoms it came in with.
Once the transmission is back together and in the vehicle, if it does not work flawlessly, the No. 1 task at hand is to divide and conquer the post-repair symptom(s). You must determine in which of the two following categories it falls:
Since you now have an added variable — a different valve body in the transmission — being able to narrow down the possibilities and pinpoint the problem by comparing the current symptoms against your diagnostic notes from before repair is a huge time saver. That’s why detailed documentation of original symptoms, observations and diagnostic steps taken is paramount.
By sticking to the following routine before replacing the valve body (or any other part), you can cut down on the number of repeat symptoms you encounter and make new problems easier to track down.
Be sure to get all the correct vehicle information before searching. If you have the wrong year, model or engine size, you could end up missing relevant technical service bulletins (TSBs) or finding a TSB that does not apply to your problem, sending you on a wild goose chase. The easiest way to avoid this is to enter the full VIN into any of the free VIN decoders online that provide the year/make/model/engine size of the vehicle quickly and accurately.
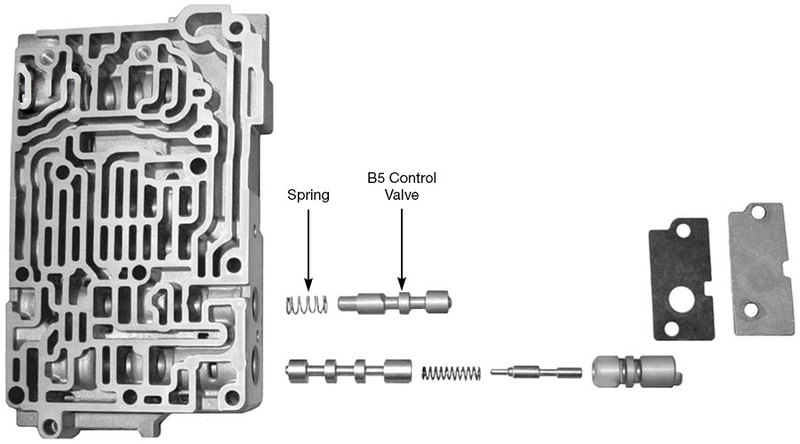
Another reason to make sure the application is correct is to avoid getting wrong parts. The best example of this is the Aisin Warner 55-50 valve body. The ’04-earlier models do not use a spring in the B5 clutch control valve lineup. When the spring was added for model year 2005 (Figure 1), the computer strategy was also changed. If you are going by anything other than the 10th digit of the VIN and you have a 2004 or 2005 in the shop, you could get the wrong valve body, which will not work correctly. This is just one common example of a built-in problem; the same applies to many other parts.
| Figure 1 – ’05-Later Aisin Warner 55-50SN Middle Valve Body |
|---|
 |
This is not that easy these days, with so many transmission models that don’t have dipsticks. On most units without a dipstick, you can’t check the level accurately once the fluid temperature is above 100°F or so. Waiting for the transmission to cool down can really bog down a diagnostic routine. To get around this, you can drain the sump into an empty container, allowing you to calculate if it was low, full or overfull. Measuring and documenting the fluid level before you test drive, or start taking things, apart can reveal important clues as to the cause of failure.
Many modern transmission fluids are prone to discoloration under normal use, and this often occurs within only a few thousand miles. For this reason, discoloration can pretty much be ignored. The smell of the fluid is what really matters, it can give good insight. Does it smell like:
Retrieve all diagnostic trouble codes in all control modules on the vehicle — whether or not you think they could be relevant to the transmission issue. Forget the scanner interpretation of the code, write down the actual code number itself. As many of you have discovered the hard way, the scanner interpretation is often wrong. With the code number in hand, looking up various technical reference material related to the codes will return more accurate and complete information. The most critical info you must find are the “code setting parameters.” By knowing exactly what must happen for a given code to set, you have a veritable cheat sheet to follow. The code setting parameters will tell you, among other things:
Drive the vehicle if possible. Of course, nobody wants to go on a test drive if there is a chance of getting stranded. In most cases it can be done if you don’t venture too far and have a “rescue” vehicle follow. Even if the customer says it quit moving on them, this can often be a consequence of the filter being restricted by contamination. If that is the case, it may still drive after sitting for a while, allowing you to perform a quick road test. If there is no Reverse, or if it neutrals out on one of the upshifts, you can still gain a wealth of knowledge by taking the vehicle for a short spin to record a data stream movie and observe for yourself what is not working properly, as well as what is working as designed.
If you don’t or can’t test drive, it is much more difficult to tell if a post-repair problem was built in or if it was simply not addressed during the repair. The bottom line is that it could end up taking you longer to figure out problems post-repair if you did not go on a test drive and document how it shifted — or didn’t shift — when it came in originally.
DTCs are important indicators, but they do not tell the whole story. Most modern scan tools have the ability to record so-called “movies” of the transmission and engine data streams. This is one of the most powerful and useful features of the expensive scan tools we all buy, yet it is one of the least understood and used. Get familiar with this scanner function and make a movie of the data while driving — BEFORE you start tearing into the transmission — then save the movie in the tool for initial diagnosis and future reference. Having a recording to compare the data before and after the repair can be a huge time and money saver. Even if the symptoms feel the same after repair, reviewing the movies might reveal that it is a tad better or worse, which can help you figure out quickly if you are heading in the right direction or barking up the wrong tree.
Always check for factory technical service bulletins related to any symptoms and DTCs present. You’ll often find that a code you thought for sure would not be relevant to the transmission issue will lead you to a TSB that indicates the code could indeed be related. Or, of course, you can find out that a reflash or updated part is available to ensure that, once you are done rebuilding this transmission, it goes out and stays out.
This is very important, though often overlooked: test the charging system and the battery condition. A dead battery might mean any codes that were present in the computers will be gone by the time you try to retrieve them. Knowing that there might have been codes in the computer memory that were lost due to low battery voltage could be very important down the road. Most importantly, computer-controlled transmissions will not work properly if the charging system and/or battery is not in tip top shape.
If the transmission has a TCM mounted internally on the valve body, be sure to test the fluid for the presence of glycol and water. Both are the slow kiss of death for electronic components, and many times glycol intrusion from a failed heat exchanger will not even change the color of the fluid; the days of the “milkshake look” are quickly disappearing. Better safe than sorry here, TCMs found inside the transmission are never cheap! As the saying goes, the customer can pay for it now, or you can pay for it later — under warranty.
Too often when tech support representatives ask what components were damaged before repair, the answer is:
Documenting exactly what components were “burned up” or “trashed” is key diagnostic information. During teardown, take the time to write down precisely the name of each friction element (if any) that showed signs of slippage. Knowing which elements had been slipping originally — as well as what other parts were damaged — helps a great deal when diagnosing a post-build problem.
Having all this information documented will really come in handy, saving you time and money down the road by helping you determine if an issue is a new, built-in problem or something that simply was not fixed during the previous repair attempt. The diagnostic process outlined above is really just a way to efficiently gather pieces of a puzzle. The more pieces you have, the easier it is to snap together a full picture of the problem at hand.
When it comes to making the right diagnosis the first time, or quickly figuring out “built in” problems after repair, the best troubleshooters will tell you a well-laid diagnostic plan is critical. Equally important is documenting the path taken. After all, they say the palest ink is more reliable than the most powerful memory.
Be sure to check out: Replacing Valve Bodies Dos and Dont's! Part II
Robert Moreau is a Sonnax technical specialist and a member of the Sonnax TASC Force (Technical Automotive Specialties Committee), a group of recognized industry technical specialists, transmission rebuilders and Sonnax Industries Inc. technicians.March 28, 2018
Robert Moreau
While Sonnax makes every effort to ensure the accuracy of technical articles at time of publication, we assume no liability for inaccuracies or for information which may become outdated or obsolete over time.